The Instapage WordPress plugin lets you publish your Instapage landing pages on your WordPress.org website. Every landing page you publish through WordPress becomes a subdirectory of your website, for example www.yourdomain.com/offer, so your pages work as a natural extension of your brand.
This article explains how to install the plugin, connect your Instapage workspace to WordPress with a CMS token or with your Instapage login, publish a page, connect several WordPress websites, and fix common publishing problems. It is for WordPress.org (self-hosted WordPress) websites. To publish on Drupal instead, see Downloading and installing the Instapage module on Drupal.
- Step 1: Install the Instapage plugin in WordPress
Step 2: Connect your Instapage workspace to WordPress
- Step 3 (recommended): Add your WordPress domain in Instapage
- Step 4: Push the page to WordPress
- Step 5: Publish the page from the WordPress plugin
- Publish to several WordPress websites from one workspace
- Troubleshooting WordPress publishing

Step 1: Install the Instapage plugin in WordPress
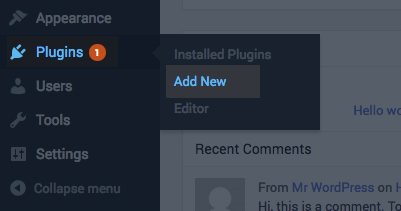
Sign in to your WordPress admin, click Plugins, and then click Add New.
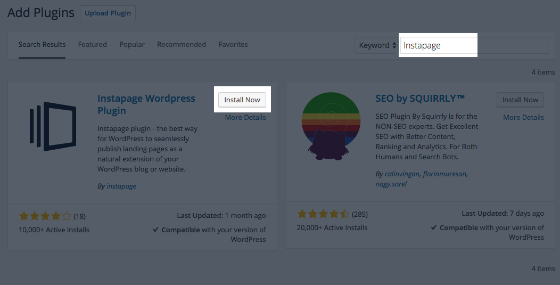
Search for Instapage. In the Instapage Wordpress Plugin result, click Install Now. If WordPress asks you to activate the plugin, click Activate.
Step 2: Connect your Instapage workspace to WordPress
You can connect your Instapage workspace to WordPress in two ways:
With a CMS token: a WordPress admin connects the workspace without your Instapage login details. Use this option if someone else manages your WordPress website.
With your Instapage email and password: you sign in to Instapage from the plugin and choose which workspaces to connect.
Option 1: Connect with a CMS token
First, copy the CMS token of your workspace from Instapage:
Open the page you want to publish. Click Publish Page in the page slide-out panel, or Publish in the builder, and then choose WordPress.
If your workspace is not connected to WordPress yet, the message You need to connect WordPress to Instapage appears, with the links NOT THE WORDPRESS ADMIN? and SWITCH METHOD.
Click NOT THE WORDPRESS ADMIN?.
The WordPress dialog opens. It explains that a WordPress admin can use this token to sign in to the Instapage plugin and connect to your workspace without transferring login information. Click COPY to copy the CMS Token.
If you can't see the token in the publishing panel, or another WordPress website is already connected, you can copy the CMS token from the Integrations dashboard instead: click the name of your workspace, select Workspace settings > Integrations, and open CMS Token under Publishing Integrations.
Then, add the token in WordPress:
In your WordPress admin, click Instapage in the left-side menu and open the Settings tab of the plugin.
Under Client tokens, paste the token in the Add token field and click ADD TOKEN.
If you don't have permission to change the WordPress website, you can send the setup instructions to your WordPress administrator. In the WordPress dialog in Instapage, click SEND SETUP DIRECTIONS, enter the email address of your WordPress administrator in the Recipients field, and click SEND. The email contains your workspace access token and the steps to add it in the plugin.
Option 2: Connect with your Instapage email and password
In your WordPress admin, click Instapage in the left-side menu and open the Settings tab.
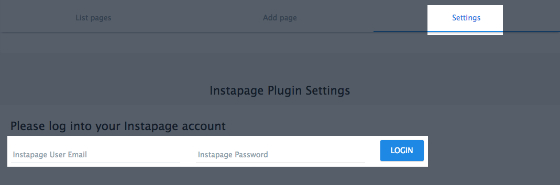
Under Please log into your Instapage account, enter your Instapage email address and password, and click LOGIN.
Select the workspaces you want to use with this WordPress website, or select All, and click CONNECT TO WORDPRESS.
Step 3 (recommended): Add your WordPress domain in Instapage
To prevent publishing errors later, add the subdomain and domain of your WordPress website in the Instapage Domains dashboard. Add the exact subdomain you publish on through WordPress. For example, if your website is on www.yourdomain.com, add "www.yourdomain.com", not "pages.yourdomain.com" or another subdomain. For instructions, see Adding and managing custom domains.
If another Instapage account already added the domain, Instapage shows the message Another Instapage user has already added this domain or subdomain. Click REQUEST ACCESS. The domain owner receives your request by email and in the Global domains section of their account. After the owner approves your request, you can publish your pages on WordPress normally. For more information, see Global domains - domain access.
If you own the domain and want it moved to your Instapage account, follow the steps in How do I regain ownership over my domain?
Step 4: Push the page to WordPress
Open the page slide-out panel, click Publish Page, and select WordPress.
The message "[your workspace] is connected to WordPress. After pushing this page to WordPress, navigate to the Instapage plugin to give this page a URL." appears. Click PUSH TO WORDPRESS.
Step 5: Publish the page from the WordPress plugin
After Instapage sends the page to WordPress, a WordPress admin publishes it from the plugin:
In your WordPress admin, click Instapage in the left-side menu and open the Add page tab.
Choose the workspace and the landing page.
In Page Type, choose Landing Page, Home Page, or 404 Page. For details about 404 pages, see Setting a custom 404 page when publishing via WordPress.
In URL for this page, type the URL path of the page, for example "offer".
Click PUBLISH.
Your page is now live. You can find it in the List pages tab of the plugin.
Publish to several WordPress websites from one workspace
To publish landing pages from one Instapage workspace to several WordPress websites, install the Instapage plugin on each WordPress website and add the same CMS token of the workspace to all of them.
When you push a landing page to WordPress, the page becomes available for publishing in all the connected WordPress websites. To publish the page, sign in to the WordPress website where you want it and set its URL there. If the WordPress websites must not see each other's pages, use a separate Instapage workspace for each WordPress website.
Troubleshooting WordPress publishing
Cache plugins: disable any cache plugins installed on your WordPress website. Caching can stop your Instapage pages from loading correctly.
Plugin conflicts: other WordPress plugins can conflict with the Instapage plugin. There are too many WordPress plugins to keep a fixed list of the ones that cause problems, so disable other plugins one by one to find the conflict.
EasyWP hosting from Namecheap: EasyWP uses advanced caching (Varnish, Opcache, and Redis object cache) that interferes with publishing. With EasyWP, you can have only one page published through WordPress. When you publish another page, the first page is unpublished automatically.
Outdated plugin: always use the latest version of the plugin. You can check the latest version on the Instapage plugin page on WordPress.org.
If you can't disable caching, publish your pages on a custom domain instead. Custom domain publishing lets you use your domain name without going through your WordPress website. For instructions, see Publishing on a custom domain (CNAME).
- Publishing through WordPress does not count toward the subdomain limit of your subscription. Publishing on a custom domain (CNAME) does. The account owner can check the subdomain limit in My Account Admin > Subscription.
- For more solutions, see Troubleshooting WordPress or Drupal publishing.